Before beginning of the assembly one ought to inspect boards and to plan out their arrangement. Boards in packs have different, but repeatable length and to obtain the best effect, one ought to arrange them on the floor at random order one recommends opening simultaneously several packs and during installation of boards mixing them from all open packs. Boards are intended to assembly of floors inside rooms.
Boards with apparent defects should not be assembled and possible complaints one ought to notify in the point of sale. The following is excluded from complaint: floor with damages resultant in course of the assembly, the natural abrasion of the floor, mechanical damages during the utilization (scratches with sand, indents and cracking as the result of the flooding with fluids, etc.), acoustic effects connected with use, the differentiated coloring and the natural color change as the result of the activity of solar radiation. Natural features of wood and each board from the given sort create the original color and the appearance of the floor after the arrangement the floor may differ from the exposition in the point of sale.
The producer does not recommend putting solid floorboards on heated substrates Performers, who intend to put boards on heated substrates, will make it at their own risk. Boards made of solid wood must not be arranged as floating floors.
ACTIVITIES BEFORE THE INSTALLATION:
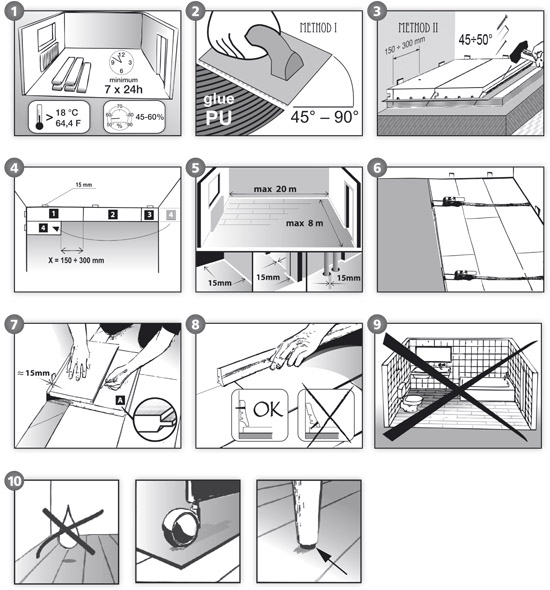
Before delivering boards on the site, all wet works (such as: concreting, plastering and decorating) should be finished according to the tectonics, and the building should become carefully dried. Storage, installation of the floor and further exploitation should take place in optimum ambient conditions, i.e. 45 60% of air humidity and in temperature ranging from +18 to +24 deg C. Floorboards should be acclimatized accordingly the packs should be stored in site of the floor assembly during period of 7 14 days before beginning of the installation. The humidity of substrate for assembly should be as follows: wooden substrate 8%, concrete substrate 2%, and anhydrite substrate 0.5%.
In view of assembly simplification and aesthetics one ought to plan the width of the last line of boards which should be minimum 70 millimeters (0.52 of the boards width). Accordingly, make the measurement of the room width before the beginning of assembly and subtract 30 millimeters (the width of expansion gaps) and divide by boards width. The obtained result is the quantity of belts of boards in the floor usually with the value after comma. If after comma we have a value from 0.05 to 0.52, e.g. 0,3, and then the width of outermost rows one ought to count in the following way: 1.3 * width of the board (e.g.135 millimeters)/2 = 87.75 millimeters. So the first row of boards should be trimmed to the width of about 87 millimeters and the arrangement of the floor will be finished with the same boards width.
There are two methods of assembly of solid boards: sticking to the substrate or fastening to the wooden substrate by means of hidden nails.
METHOD I Sticking boards to the substrate This is the suitable method for the arrangement of the floor on the concrete substrate or on the screed. The method is suitable also for arrangement of the new floor on existing timber floors which are stable and leveled.
The glue must cover at least 60% of the boards surface. The concrete substrate should be dry and fulfill the following durability conditions: the severance durability minimum 1 Mpa; compression durability minimum 25 Mpa. Only polyurethane and synthetic glues recommended by producers to cementation of timber floors, factory varnished are accepted. IT IS NOT ALLOWED TO APPLY ADHESIVE DISPERSIONS!
1. The first row of boards should be glued with the joggle toward the wall, maintaining the expansion gap. One ought to press it till the glue will bond with the substrate. The excess glue squeezed out on the surface of wood should be immediately removed using the moist cloth. The glue must not be put on the feather nor the joggle of floorboards.
2. One ought to always arrange boards scalariformly, indenting ends at about at least 150 millimeters, but not more than 300 millimeters. The last board in row should be measured and cut off leaving the expansion gap of 15 millimeters. If this is possible, start the following line with the part remaining after cutting off.
3. After the arrangement of first three rows of boards, for purpose of their gathering together and holding on the place in time needed for bonding of the glue, one can use clamping belts.
4. At the last row one can measure the width of the last board setting it to the wall and marking the proper width.
5. One ought to cut out openings for all pipes, columns, frames and other obstacles maintaining the suitable expansion gap.
METHOD II Fastening to the wooden substrate on hidden nails
Floorboards can be fastened with hidden nails directly to previously prepared wooden substrate. If existing wooden boards are sufficiently stable and flat, then new boards can be arranged directly on them at an angle of 90°. If new floor boards will be arranged in the same direction as the old ones, one ought to attach sheets of plywood (at the thickness of minimum 6 millimeters) to the existing substrate, leaving 15 millimeters expansion gaps among sheets. If the existing wooden basis is not sufficiently leveled one ought to level it by means of e.g. the waterproof plywood.
Arranging the floor on the concrete substrate, one ought first to arrange the layer of the steam-insulating foil, and then at intervals of 18 24 millimeters sheets of the waterproof plywood and fasten to them by nails the specific floor. Note: 1) If boards are fastened on nails /screws one ought to consider, not to damage installations located in the floor. 2) Boards 18 millimeters made of solid wood cannot be fastened directly on sleepers and on ceiling beams.
1. The first row of boards should be arranged evenly with the joggle directed to the wall, maintaining the expansion gap. Then attach with the nail or with the screw from above (deployed at 200 300 millimeters distances minimum 2 connectors on the board, if it is possible 75 millimeters from the end of each board). In like manner fasten connectors on the length of these boards at an angle of 45° 50° inserting connector into the feather. In order to facilitate works, one can use nailing machine or turn screw machine.
2. Put the next row of boards with the joggle into the feather and attach with connectors to the substrate at an angle of 45°-50°.
3. Arrange boards from left to right. One ought always arrange boards scalariformly, indenting ends at about at least 150 millimeters, but not more than 300 millimeters. The last board in line should be measured and cut off leaving the expansion gap of 15 millimeters. If this is possible, start the following line with the part remaining after cutting off.
4. At the last row one can measure the width of the last board, setting it to the wall and marking the proper width. Place the board on the last line on the board from the previous line. Using scraps of the full width and dilatation wedges situated at the wall, mark the line of the cut on the last line.
5. One ought to cut out openings for all pipes, columns, frames and other obstacles leaving the suitable expansion gap.
6. At the end, attach the last line of boards like the first one from above and let in nails heads into boards. Fill places of joining with putty.
Finishing:
Immediately after arrangement we decorate the floor, expansion gap and mask with skiltings which are fastened to the wall.
Renovation and regeneration:
The board is factory finished: with UV varnish or with UV oil. For renovation and regeneration of the varnished board we recommend the usage of polyurethane varnishes, according to instructions of the producer of varnish, after previous tarnishing, degreasing the substrate and performing the test of the lacquer finish in less apparent place. For renovation and preservation of oil finished floors we recommend the usage of special wood dedicated oil the preservation should be carried out just after the assembly of the floor, and the following preservations minimum once half a year. Note: Renovation works should be ordered to professionals. The intensive exploitation of the varnished coat should succeed after about 7 days. For putting of varnish one ought to use tools intended for polyurethane products. For more information see complete instruction (Internet site: www.barlinek.com).